
Create your animations > Bind your data for Quadraviz
Bind your data for Quadraviz
Learn how to configure your data to be controlled in Quadraviz
🛠 Example Setup
We’re using a Rive file for a waiting screen that includes:
inandoutanimationsAn
adsloopA gradient
loopAn
idleanimation (for empty screen state)
All layers start at 0% opacity, so don’t forget to set 100% opacity keyframes in other animations where you want them visible.
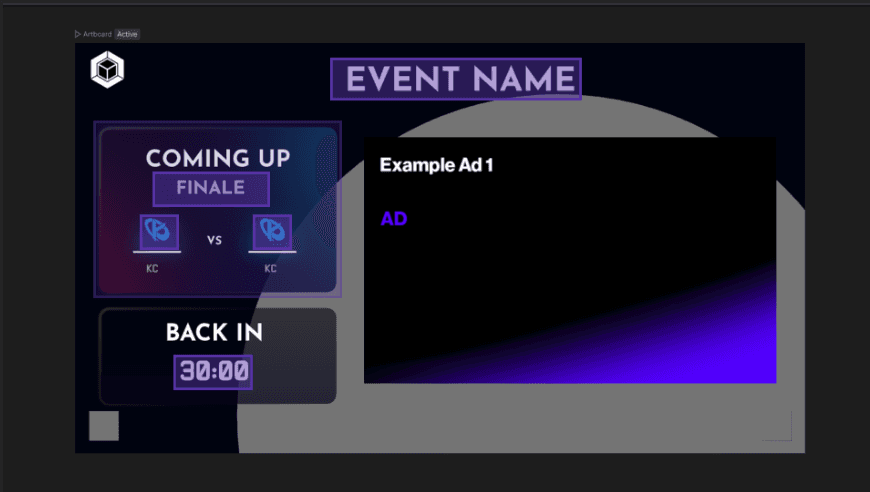
What are we making dynamic?
Team logos, names, and colors
Event name and stage
Ads images
Countdown timer
In and out animations
Step 1: Create View Models in Rive
Parent View Model:
We'll call this Main – it will contain all your dynamic data for the artboard.
Children View Models:
Team: Contains a color, a name (string), and a logo (image)EventData: Contains event name and phase (both strings)Ad: Contains just one image
Instead of duplicating structure for each team or ad, we'll create instances of these view models:
Team1andTeam2Ad1throughAd4
Add dummy data for placeholders (e.g., names, colors, sample logos).
We don’t need to export all the instances, only the parent view model (Main) instance needs to be exported and bound to the artboard.
Step 2: Populate the Main View Model
In Main, we’ll:
Add the two
Teaminstances (Team1,Team2)Add the four
Adinstances (Ad1,Ad2, etc.)Add
EventDataAdd a
Timer(we’ll use a number type)Add two triggers:
inandout
Don’t forget: Assign the correct instance to each binding. If you don’t, Rive may reuse the same one (e.g., showing the same team twice).
🔗 Step 3: Bind Data to Rive Elements
In Rive:
Bind the
MainView Model to the artboard.For each Ad image:
Select the image → Right-click the image property →
Data BindUse:
Ad→Main→Ad1,Ad2, etc.Green indicator = good, Yellow = something’s off
Team colors (for shapes or gradients):
Right-click color →
Data Bind→Team Color→Main.Team1orTeam2
Team names (text run):
Right-click →
Data Bind→Team Name→Main.Team1/2
Event name & phase:
Bind each to its respective text layer from
Main→EventData
Timer:
Use a number type in your view model
Create a converter to turn it into a string (right-click →
Add Converter→To String)Set a value like
30for testing
State machine triggers:
Set transition from
idletoinwheninis triggeredFrom
intooutwhenoutis triggered
✅ Test It All
Hit play or run the state machine manually.
Set the
intrigger in the Main ViewModel.Make sure everything updates correctly (logos, names, colors, etc.)
Fix any binding that’s missing a parent reference.
Join our Community Forum
Any other questions? Get in touch